CURRENT POSTINGS FOR JULY 2000 |
| 31/07/00 - FITTING
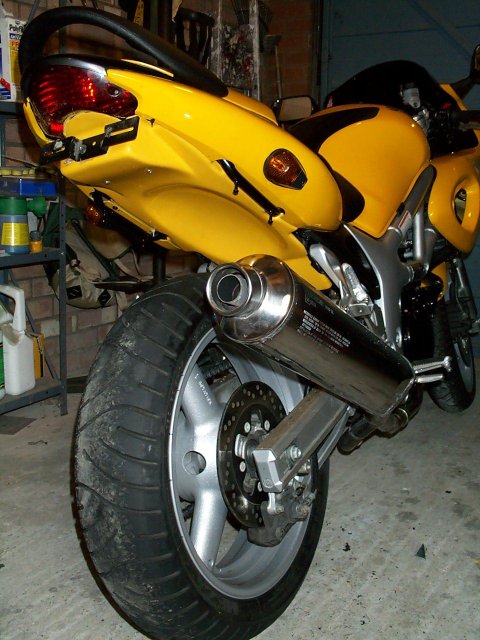
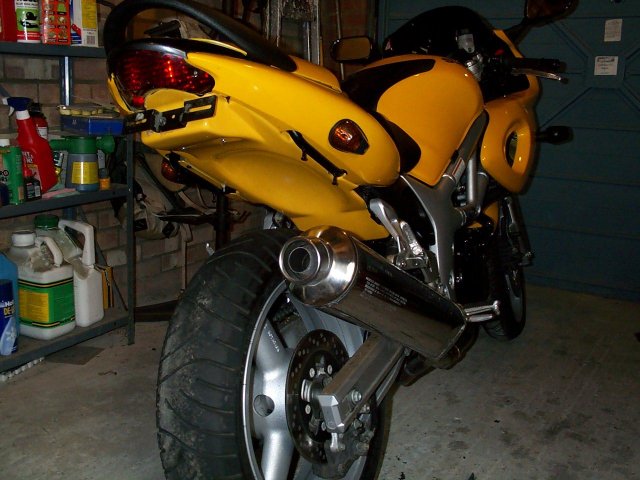
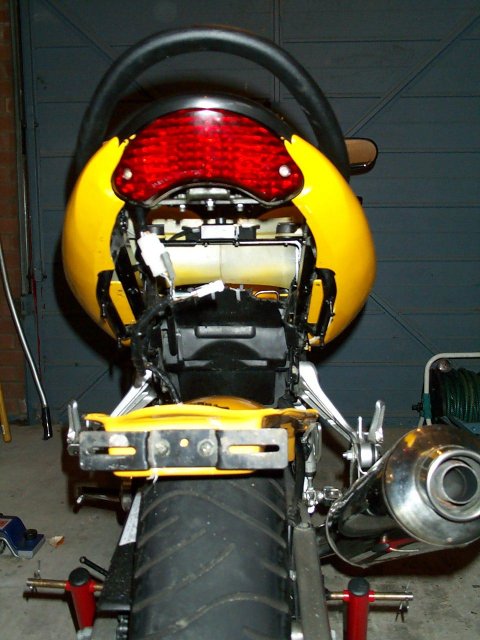
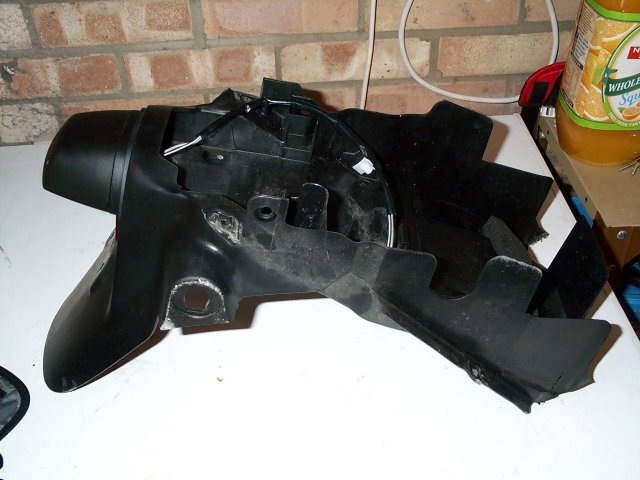
AN UNDERTRAY (THE HARD WAY) - Thanks very much Russell (Russell@gladwish.fsnet.co.uk)
for the text and pics....
I am not a mecanic, but over twenty years of tinkering I've just about buggered everything up I can and have learnt by that! I was not prepared however for fitting an undertray. I stand to be corrected if anyone has a better way to do this. The man at M&P said "oh yes, all the instructions are included". This was one A4 sheet which virtually said, take off old fender and fit undertray. The tray came with no pre drilled holes and it was left to me to decide where to mount it. At this point I would say, if you are going to try this, once you have started there is no going back. You have to cut the old fender up to save the battery holder. I have taken a picture of what was left of mine so you can see what I took off. First take off the number plate, indicators, seats and take out the battery. Undo all the screws connecting the rear bodywork to the frame and remove. I did this in one piece leaving the two side pieces joined to the grey bit behind the grab rail. Now take off the old fender. There are lots of screws and bolts for this, you'll just have to search for them as I cant remember exactly where thay are now. Once off you will have to cut the battery holder off and re-fit it in its place. I bolted this back and steadied it with some cable ties around the front seat retaining bar. At the rear of the side panels there are two protruding lugs that the old fender screwed into. These need removing and fileing down behind for the undertray to fit snugly up to the panels. Now loosly re-fit the side pannels and offer up the undertray. To get a good fit I had to trim quite a bit here and there which I was not too pleased about and did this with a 'Dremmel' and sanding attachments. Make sure the undertray is central and mark where you can drill through the panel and undertray. Drill your holes through both panel and undertray and then remove the undertray. Take the old number plate bracket off the old fender and attach it to the undertray. Now offer up the undertray again to the bike and secure to the side panels with the plastic screws provided. To be safe I have also attached the back of the undertray to the top of the battery box. This both tensions the undertray and secures the battery box. Its then a case of tightening up everything. The recifier needs fitting and I just screwed this to the inside of the undertray. I have used screws in two points and cable ties at another three as it was the best way of attaching the panels to the tray. Anyway it fits and is solid and secure. There are bits for refitting the tool pack but they are useless. Also the tank prop now has no home! The numberplate then would not fit so I had to drill more holes, a new numberplate coming now. If anyone wants to have a go but wants to know more drop me an e-mail and I'll help if I can. If you want to fit indicators fit them when the side panels are off. Undertray
from rear side |
| 31/07/00 - SPROCKETS
- Thanks to Roger (GrowRH@LOUISVILLE.STORTEK.COM)
for the info...
Sprocket Specialists (http://www.sprocketspecialists.com/) sells Both
front and rear, but only offers aluminum out back. It looks like the 91-93 GSF-400 (is that the Bandit?) shares the same rear, and the 98-99 GSXR 600 and 750 share the same front sprocket as the SV. (same S.S. part # as the SV). Possible cross-reference match there. |
| 31/07/00 - ELECTRICAL
PROBLEMS - This info is IMPORTANT - please read - thanks Ron (ron.chain@ukgateway.net)...
I thought you might want to pass some of this info along. yes, I do... We just got back from our 2nd trip to Europe with our 2000 650SVS. Again, the bike proved to be a very worthwhile tourer, we put about 2800 miles on the clock in 14 days. (France, Switzerland- snow on the passes- pretty interesting on a motorcycle- Austria and Germany). The only problem experienced was an electrical failure on the autobahn in Germany. While cruising at about 75-80 mph, the bike stopped dead. There was no spark
to the engine at all, but the lights were fine. Pulling off to the side
of the road we found the 10 amp ignition circuit blown. We put a spare 10
amp fuse in and it blew immediately. Having seen previous postings regarding
the problem (I think it was John Tapley who told me
about this originally) with the seat holdown screw chaffing the wire loom on the
left hand side, we checked this (I had looked at it previous to the trip We subsequently took it to a Suzuki dealer near Koblenz who checked everything over, cleaned all the contacts, etc. etc. and could also not find anything wrong. (This dealer was excellent- he took us right in, spent about an hour with the bike, cleaned it and charged us nothing). The problem had obviously 'fixed itself', or had at least gone away for a while. It got us back to the UK with no more problems, but not being convinced that all was really well, I took another real close look at the wire bundle on the left hand side under the seat. I pulled the black tape away from the bundle where the wire passes against the tab that holds the seat hold down screw. (You have to cut the factory zip tie and pull the wire bundle down a bit away from the frame to do this). Upon closer inspection, I could see where one of the wires had a very small black mark where in had chaffed through and arced, shorting out against the metal tab for the seat screw. I taped the bundle again with electrical tape, and then put a section
of bicycle inner tube, cut to size and slit down the middle, around the bundle
then taped it again to offer greater chafe protection. I then zip tied the
wire bundle both forward and aft of the seat tab to the UPPER rail. This pulls the wire bundle completely away from the seat tab, as the wires
on my bike were resting against this tab. Even tho there appears to be no
movement, there obviously is as mine chaffed through, just barely but I really think Suzuki should put a service note out about this or something, as I would think just about every SV out there is a candidate for this to happen. |
| 25/07/00 - BWRACING
URL - Thanks Nick (nick_hall@europe.adaptec.com)
for sending this...
Thought this may be of interest, as these guys are very well known
for their underseat systems for Triumphs (and have a great reputation for quality/performance). |
| 25/07/00 - NWS
HUGGER FEEDBACK - Thanks Kevin (kevin.spud@talk21.com)....
The site goes from strength to strength - good stuff! |
| 25/07/00 - CHAIN
& SPROCKET REPLACEMENT - Mike (Mike.Victor@swpc.siemens.com)
asks....
Does anyone have any experience yet in ordering sprockets & chains? |
| 20/07/00 - TYRE section updated... |
| 18/07/00 - SV650
EMAIL GROUP - This from (sature@home.com)
in Vancouver...
I just want to tell everyone who ives in the vancouver to join the sv650 e-mail group. It's at sv650_bc@egroups.com. I hope u get this Matt (yellow sv650s form PM). |
| 18/07/00 - BIKE
INSURANCE & THE MERITS OF THE BMF - Thanks Ken (Ken@sif.co.uk)
for the information...
Here in Northern Ireland Insurance is expensive and hard to come by,
however, joining the British Motorcyclists Federation saved a fortune. Also with regard to insurance is this from David (david.leopold@merton.oxford.ac.uk) (sorry David for the very late posting).... On the question of insurance - after a year of not claiming and growing even older Hill Hammond wanted to put my insurance up another Ł15. Instead I saved Ł70 (and got RAC recovery) by phoning Carole Nash. |
| 18/07/00 - VIBRATION,
CORROSION & FURTHER LOOM PROBLEMS - John (john.tapley@bt.com)
is kind enough to impart his comments.....ta..
A couple of lines on some recent problems. Vibration - Causes can vary but it might be worth checking the balance of the front wheel. A new tyre or a recent thump may could cause this. Wiring loom - I recently had the rear body work off and noticed chaffing on the wiring loom. The loom runs along the left frame rail to the rear light. The chaffing occurs on the rearmost cross member and can be checked with the rear seat off. The crossmember supports the grab rail and has sharp edges. The loom is pushed against this sharp edge by the plastic understray. My wiring wasn't damaged but the outer wrapping was worn through. Corrosion - I've just had the joy of drilling out the corroded brake
pins on the rear brake caliper. I took the trouble of also fitting new stainless
steel bleed nipples and a chrome Goodridge brakeline. I got the nipples from
OEM (http://www.oem-uk.com/) size is mx7x1mm thread. They do some other nice
goodies too |
| 17/07/00 - SV
SEAT HEIGHT REDUCTION - Winston (winfox19@netscapeonline.co.uk)
has been chopping, as I know others of you have to reduce seat height.. Just a short note saying how easy it is to lower the seat height by taking the cover off and cutting at least an inch off the four inch thick foam, then replacing the cover. I am short in the leg and this mod works superbly - I can see no reason why Suzuki made the seat with such a thick foam base anyway. |
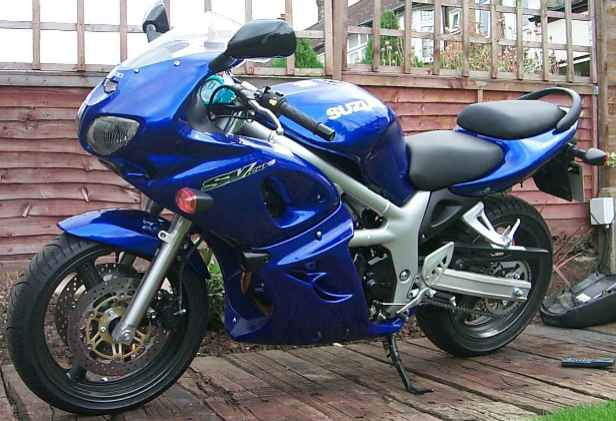
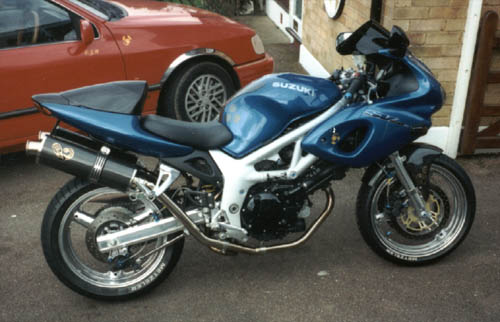
| 17/07/00 - BLUE
SV IMAGE - Thanks Mike (mike.collier@btinternet.com)...
Not seen too many blue Y2K SV's with lower fairings, so here you are....... |
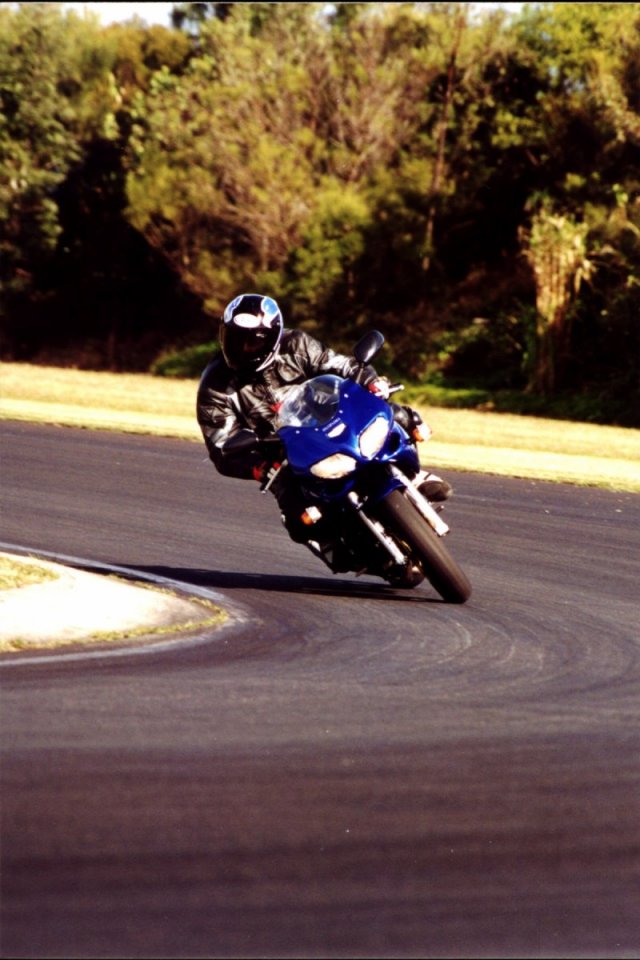
| 17/07/00 - SV
TRACKSIDE - Matt (dream@bix.thehub.com.au)
sends comments and an image...
The photo was taken in the afternoon at a rider development course held last month, the circuit being just south of Brisbane,
Australia. Emergency stops from 100km/h plus, counter-steer avoidence's (cardboard Volvo cutouts) and slalom cornering were some of
the exercises we were tested on. I don't think there was one guy or girl there that didn't learn something. We also got to put it all to good
use in the afternoon track session. If you've never done an advanced rider course, do yourself a favour and go give it a shot. |
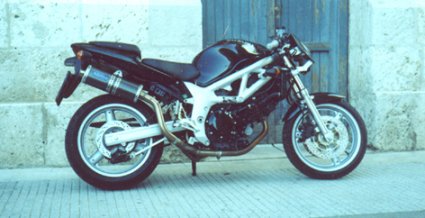
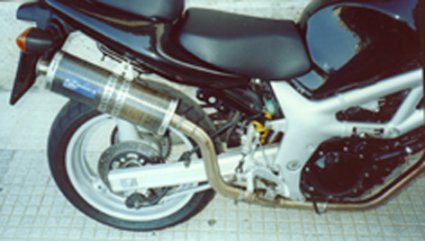
| 17/07/00 - SV
MOVIE OF TWO BROTHERS CAN - Thanks Francine (f.baillergeant@wanadoo.fr)...
Here is a movie of the SV650 with the TBR C-4 High Slip On. More information at www.twobros.com |
| 14/07/00 - Images from Catalog 6 now available in the Images section |
| 14/07/00 - MORE
"HOW TO" INFORMATION WITH DETAILS IMAGES AND TEXT - Thanks John
(johncall@hotmail.com)...good
stuff, watch your hit counter go....
I see you have been busy redesigning your web site -looks nice. I
wanted to let you know about the HOW TO pages I made to help others boost the
performance of their bikes. These pages tackle all the biggies like rejetting (for only $10!), carb needle shimming, adjusting the air/fuel
screws and best of all performing a snorkelectomy. All of the pages have detailed pictures and instructions, and the procedures all done by
yours truly on his own bike (US model) -so I know they work. |
| 14/07/00 - RENEGADE
EXHAUSTS UK
Comments and a before and after sound file of a Renegade system available now in the Exhausts section. |
| 12/07/00 - RENEGADE
EXHAUSTS UK
The Renegade F.A.Q. has been revised in places following recent feedback...please check it out... |
| 12/07/00 - MORE
VIBRATIONS - In response to Emma
posting Doug (Douglas.Pepper@KPNQwest.com)
has this to say....
I had no problems with vibration until last week.. I was recently on a course down south and had my baby serviced during my stay, so I borrowed a friends blade to get to the course location. Now he had told me due to mismatched bar end weights and a couple of other things, that I would notice a little vibration (bear with me, getting back to SV in a mo). After the morning commute of 55 mile, my right hand had gone numb from it. That night I picked up my SV having had Goodridge front lines put on (brakes are much sharper I'm happy to report), and apart from the cost of the service (183.00 sterling) I found no problems. The ride back from the shop was only 23 miles, and I was as my missus would put it playing. On the way back to Manchester, via North Wales, my right hand went numb again. Weird I thought, maybe after the bashing on the Blade, my hand was more susceptible to vibration. I think that the addition of the brake lines may have thrown the balance of the bars out, or something along those lines. I only really notice the problem after about 40 miles ( I covered over 1500 km last week on my bike alone). I don't want to lose my sharper brakes, so will put up with it. Of course the dealer could have left something loose, but I will have to check, as I am not sure of the top of my head what they should check on a major service, or where to start looking. |
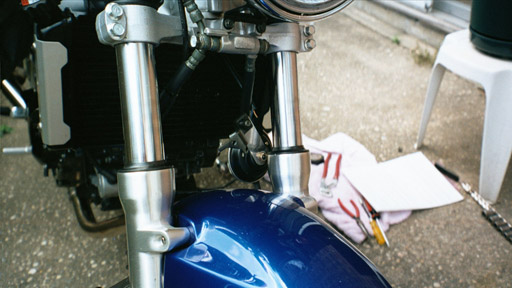
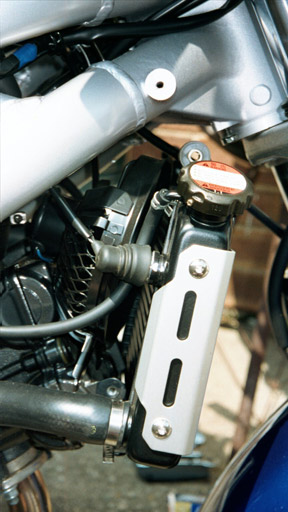
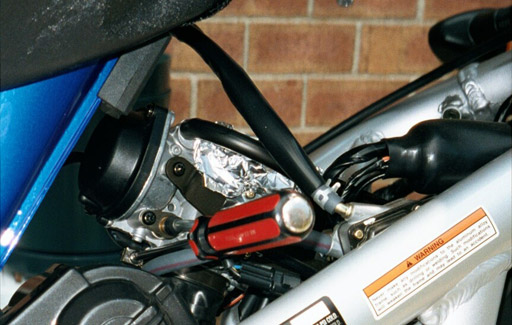
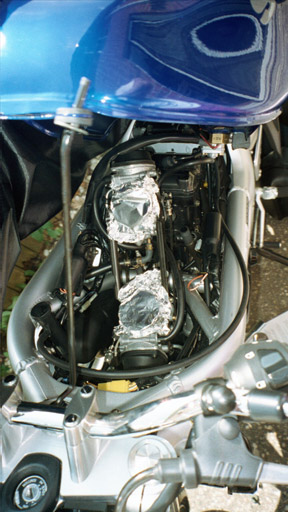
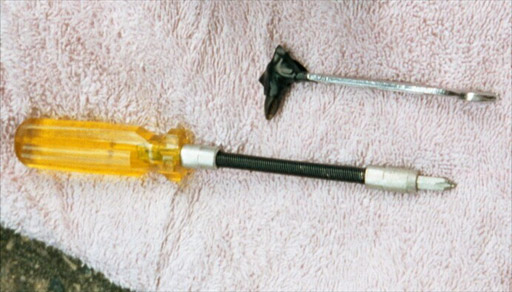
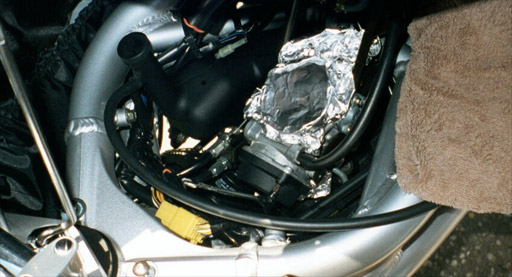
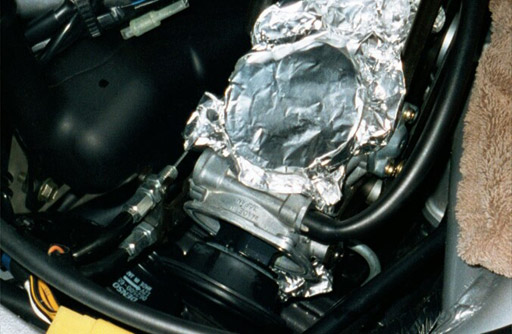
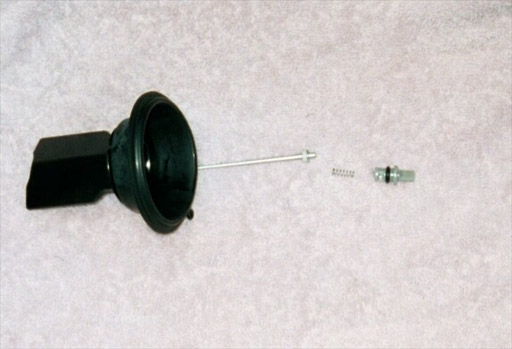
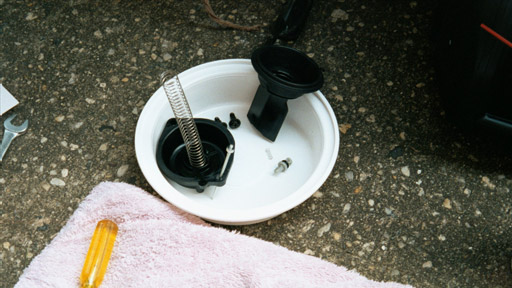
| 12/07/00 -
SV CARB SHIMING IMAGES - True to his word Eric (eguzewcz@ix.netcom.com)
has sent these great images of how he shimmed his carbs...thanks...
Eric's original posting can be seen here. These images will also be linked from the 'How to' section for information... 1) Seat attachment bolt removal |
| 12/07/00 - DROPPING
FORK HEIGHT - Any thoughts/feedback to Andy (papercup@clara.net)
please...
I am talking about dropping the forks through the yokes to quicken the steering. Has anyone done this on an SV, and by how much? I rode a 'blade the other day and the only thing I liked was the way it tipped into corners. I know it has a 16" front but i have heard of people doing this on other bikes. Any ideas, advice or experience? I am looking at 10mm to start, and it is booked in in a week at the dealer so I need to hear any thoughts
on it by then. I will gladly post my results/experiences when I have it done
but any guidance anyone can give before would be most welcome. |
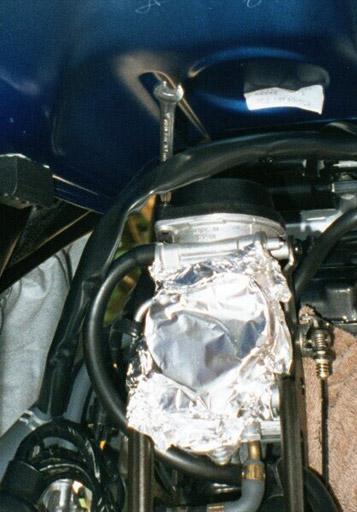
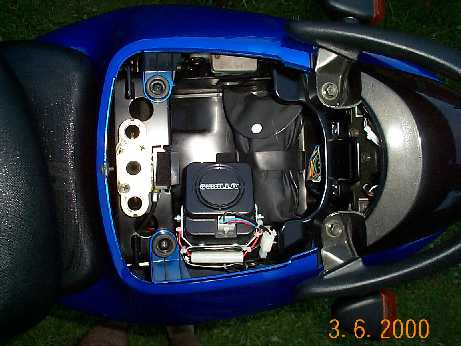
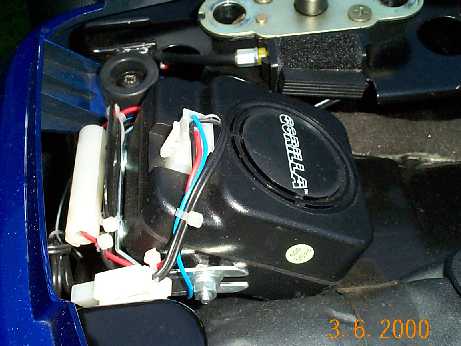
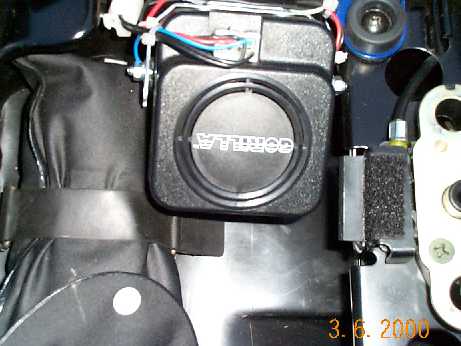
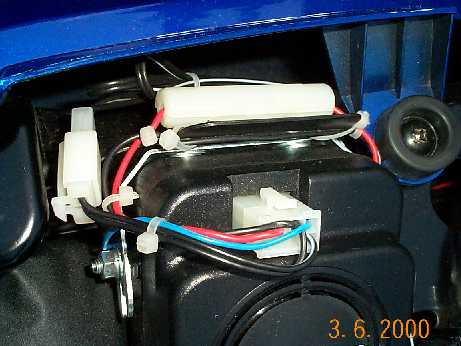
| 07/07/00 - BIKE
ALARM UPDATE - Thanks for this Tony (t.collard@talk21.com)...
In addition to my earlier posting on Bike
Alarms, please find below some pictures of the fitted article. |
| 07/07/00 - YET
MORE BENNETTS INSURANCE COMMENT - Thanks Andrew (abrasted@epson.co.uk)...if
I get many more insurance emails I'll possibly create a new section...
I thought that I would add a short comment to the tales of woe
regarding Bennetts Insurance. Before purchasing my SV650s I filled in their
on-line quick quote for an insurance guide. Cannot quite remember the figures
but the actual quote a week later was more than double. Bennetts comment was
"It's only a guide" 50 % out is hardly any guide at all. Needless to say I
went to Carole Nash. However, a friend who just passed his direct access,
24 years old, not ridden for 8 years, no -no claims discount- used a broker
in Hemel Hempstead called Humbergrove 01442 268567. They do some amazing deals where the policy is based on engine size (cc) only. Their price
was half that of the best alternative! ALSO ON THE SUBJECT - Steve (swarburton@atms.co.uk)
Last year I paid upfront for 12 months on my credit card. After a month
Bennets sent me a letter giving me 7 days to reply which I didn't so they
cancelled my insurance without warning.
I was riding uninsured for 4 days before their letter arrived to warn me. Good news about insurance companies/brokers is also welcomed.....that's if there is any.... |
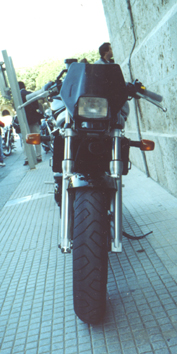
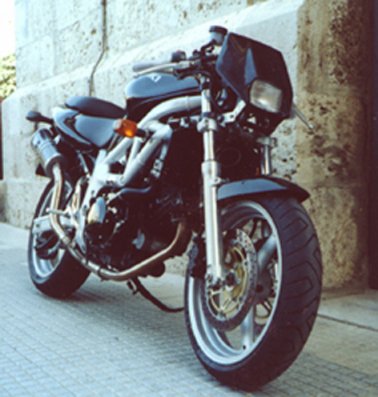
| 07/07/00 - SVS
IMAGES WITH OFFROAD HEADLIGHT - These from Cyborg in Italy.... (what's
your email address? I lost it...)
Here there are some good photos of my '99 SV-S. As you can see I took off the fairing and replaced it with an off-road lamp. I mounted up a new exhaust system and a better rearset. |
| 07/07/00 - VIBRATIONS
COMMENT - Thanks Tania (JAPORTESE@aol.com)....
Vibrations sometimes comes from the frame being stressed to the engine mounts, one way to verify this is to loosen one or more bolts that holds the engine to the frame. If the frame moves away from the engine leaving a gap. This normaly could be the cause of the vibration. One solution is to fit Metal washers in between to fill the gap. The other cause is aftermarket exhaust being mounted directly to the frame without rubber mountings. (ps...I don't think I'll adopt your registration suggestion...thanks anyway!) |
| 05/07/00 - PLYMOUTH
(UK) RIDE-OUT NOTICE - If interested please contact Jason (jasons@jasons.free-online.co.uk)...
I'm sorry about the late notice but, there is a ride out in the Plymouth area on Sunday 9th July. It's called the Mega Ride and last year there were approx. 5000 bikes there! The organisers are expecting more this year and the ride is being led by Goldwings this year. I thought that if we had a good showing from the SV's, maybe we could get the chance to lead next year!!?? It starts at Lee Mill industrial estate at 10:30am. From there, on the A38 to Plymouth to the Hoe (Sea Front). All you need to take part is a pound, collected for charity. Lee Mill Ind Est is just off the A38, towards Plymouth from Exeter. It's about 30 or so miles from Exeter in 10 or so miles from Plymouth. There will be stands, shows, etc at the Hoe, apparently!! Hope to see you there. |
| 05/07/00 - EMMA'S
VIBRATIONS - In reply to Emma's
posting this is what Len (QSIMDO@snet.net)
says... I've posted on several lists trying to find others with cures for what I consider to be "excessive" vibration, but either it's not a wide spread problem or you've all had it with whingin' and snivellin' so I gave up! I don't notice anything... FIDO! Sorry, Emma! I've no idea at all why a 90 degree twin should vibrate like that. (and why is there no character on the key-board for "degree"?) hmmm...good question.. |
| 05/07/00 - A
COUPLE OF QUERIES - These from Andy (ASchmeller@aol.com
)...
First of all, as you surely know, your site is one
of the greatest sites about the sv i could find anywhere. you
mean one of the only....
I saw a picture in your archives and I would desperately like to know
whose bike it is and where he got his parts from.
The pic is: ozzycustom2.jpg maybe you
can give me his email adress or tell me where he bought his parts. Ozzie
works with Jorge at Renegade down near Brands Hatch, UK...see the front
page of this web for Renegade info.. |
| 05/07/00 - MORE
ON UK INSURANCE - Alex (alex.t-s@virgin.net)
contributes....
I am just writing to agree with Emma Dighton. I would strongly not recommend Bennett's Insurance. I once had the misfortune of being insured with them and experienced nothing but incompetence. They ended up threatening to take me to court for Ł250 I did not owe them, but had to pay because of the constant addition of legal fees. I may as well have beaten my head against a brick wall for all the sense and help I got from them. Of course all insurance companies are thieves (Ł800 tpft for my SV650s because of one previous theft claim!) but Bennett's seem even worse than most - remember this is the company that wants to charge you more depending on what colour your bike is! It would be interesting for RiDE or one of the other magazines to do an expose of these companies. Whilst I wish to post people's experiences of service from insurance brokers please bear in mind that every person's situation and circumstances are different. All I aim to show by posting insurance comments is generalities, there are so many variables. From personal experience when I was with Bennett's I had no problems but moved because Carole NAsh was cheaper and offered more. I am so far happy with Carole Nash (may be different if I need to claim!). |
| 05/07/00 - SUM
OF ALL THE PARTS? - Thanks to Eric (eric.padovani@fnac.net)
for a great image...
Look at that, In the last issue of "MOTO JOURNAL", they analysed every
part of a 50 000km SV650N and their conclusion is that this bike is
impressive.
The paper is in french and as my technical vocabulary is poor it is
difficult for me to translate... Anyway if U need some more data on this
study, just ask I will try to do it.... |
|
