Installing a Targa Fairing – by Frank palocsay@shentel.net
My wife found
that her new SV650 didn’t offer enough protection from the wind at freeway
speeds. She didn’t want as much fairing
as the S, so we began a search for a bikini fairing. A member of the SV650.org list,
http://www.sv650.org/ suggested we look at the Targa fairing http://www.targa-acc.com/
. She liked it so we ordered one from
Cycle Center of Denton http://www.cyclecenterofdenton.com/
. In addition to fine service and a wide selection of parts and accessories,
the Cycle Center of Denton gives a
significant discount to members of the SV650 list. The fairing came the next week.
Color match was very good and the finish was excellent.
I had worried
about the installation, never having bought anything like this before. I didn’t need to worry. Directions were complete an installation is
a breeze. Total time, from getting the
box to taking the final picture was 60 minutes. The most difficult part of the job was attaching the windshield
to the fairing with the 7 screws, washers and nuts.
Targa includes
three heavy sheet metal brackets. Two
go on either side of the upper triple clamp,
using the supplied socket head bolts to replace the shorter pinch bolts used
by Suzuki. The third bracket is
attached under the headlight using the machine screw that holds the front brake
lines.
One the brackets
are loosely attached the fairing is fitted and mounted to the brackets. There are two rubber encased nuts which press
fit into the upper brackets. The
fairing is attached to these with two plastic screws. The rubber gives some shock protection. Once the fairing is fit to the headlight and squared with the
bike all screws and bolts are tightened.
That’s it! Enjoy!
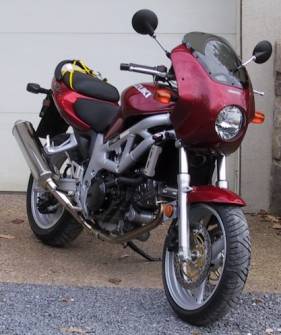
The bike looks
very different with the fairing. The
front is much cleaner, the whole bike looks more integrated. Finally, the fairing emphasizes the leanness
of the SV. But make up your own mind,
here are some pictures.
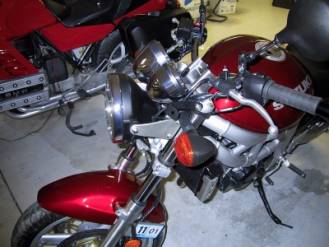 you
can see the left fairing mount just above the headlight bracket. The third is under the headlight. Notice how cluttered the front is compared
to the faired bike.
you
can see the left fairing mount just above the headlight bracket. The third is under the headlight. Notice how cluttered the front is compared
to the faired bike.
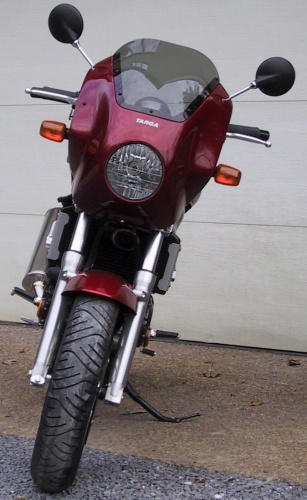
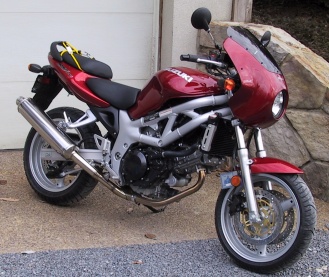
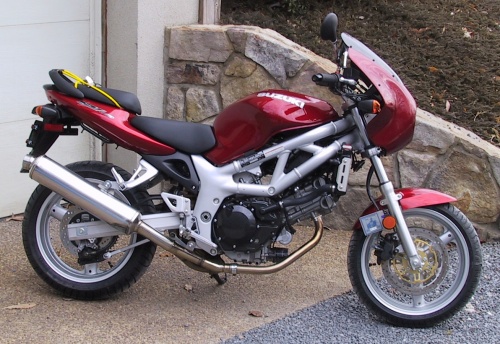
Three more
“after” shots.